User Guide
Contents
- Introduction
- 1.0 Log In & User Permissions
- 2.0 Managed Accounts
- 3.0 Dashboard Display
- 4.0 SIM List Screen
- 5.0 Search for a SIM / View Details
- 6.0 Reporting
- 7.0 SIM Status
- 8.0 Advanced Filter
- 9.0 SIM Suspension
- 10.0 Support - SIM is not working
- 11.0 Performing a Device Ping
- 12.0 Setting Data Caps & Alerts
- 13.0 Tags
- 14.0 Bulk SIM Actions
- 15.0 Glossary of Terms
What is Zest4 Connect?
Zest4 Connect is Zest4’s IoT & M2M estate management portal. It is an easy-to-use and intuitive graphical dashboard through which customers monitor, manage and report on their IoT/M2M estate.
Key Features & Benefits
- Manage your entire estate of SIMs irrespective of MNO.
- Create sub-accounts to empower your customers to manage their own estates.
- Rebrand the portal to reflect your own brand.
- Move SIMs to and from sub-accounts and between sub-accounts.
- Track SIM usage individually, by sub-estates, or the entire estate.
- Graphical filtering.
- Set and monitor data alerts and caps and be notified via email and/or portal notifications.
- Build and save custom filters.
- Organise your estate through tags.
- View the history of the MNOs to which your SIM has roamed.
- Enhanced SIM security.
Help your team be more productive
- Powerful features such as graphical filtering allow users to easily drill down and view the data important to them.
- At-a-glance monitoring of SIMs that are close to their monthly data allowance.
- Quickly produce data usage reports across the entire estate.
- Perform bulk actions such as cap and alert level setting, notification email setting, tagging and SIM moves.
- Customisable SIM list to display only the information you need, in the order you want.
Zest4 Connect makes it easy to analyse your SIM estate
- Investigate and interrogate SIM usage in detail.
- Set and manage data alerts and caps.
- Complete fault analysis by sending ping command to the device. A mobile network SIM refresh can also be performed for certain network operators.
- Display SIM data over a period to highlight trends and patterns in usage.
- Create a custom filter and graph based on the data important to you.
- Export a filtered set of SIMs to a CSV or Excel file.
- Control which SIM information is exported and in what order.
- Show the MNOs to which your SIM is roaming.
Zest4 Connect enhances SIM security
- Set secure username and password for individual or estate of SIMs, minimising the risk of unauthorised use.
- Easily suspend a SIM, preventing a new data session from being started.
- Three levels of user access: Admin, User and View-only.
- Email address change verification.
Zest4 Connect helps your business grow
- Deploy any mobile network operator SIM and manage them through a single portal.
- Maintain efficiency as you grow through the use of tags, allowing quick identification of individual or groups of SIMs.
- Provide a Zest4 Connect sub-account to your customers, giving them access to secure management of groups of SIMs.
1.0 Log In & User Permissions
Once you have logged in, you will see the below view, which is the Zest4 Connect dashboard. The Dashboard shows a summary of the current state of your SIM estate.
How to create another login
By default, your Zest4 Connect access will be provided with one admin account, usually provided to you during your first order request with us.
If you’d like to create another login you can do this on the “Managed Accounts” tab at the top of the Zest4 Connect portal:
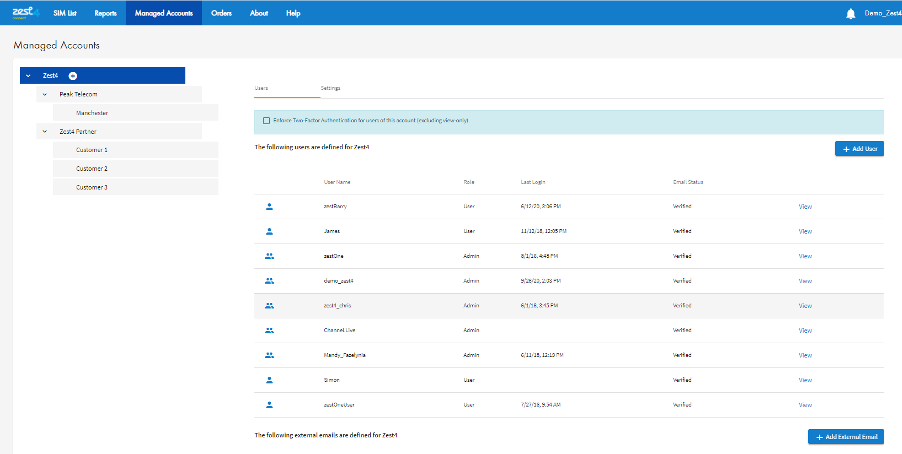
On the managed accounts page, you can now add a user by clicking the “Add user” button next to the account in question, which will bring up the following window:
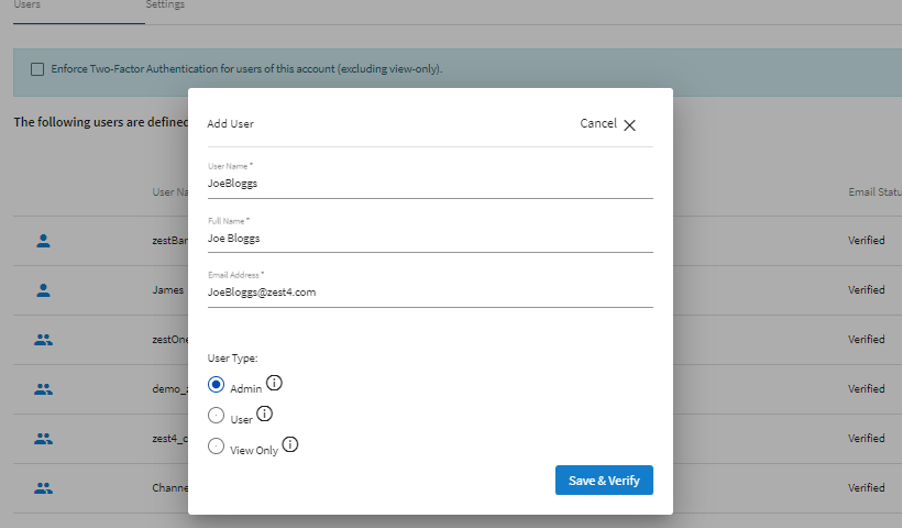
What are user roles?
A Zest4 Connect user can have one of the following types of role:
- View Only
- User
- Admin
Role selection is key when setting up a new user on Zest4 Connect.
VIEW ONLY – What can a user of type View Only do?
- View and configure the Dashboard.
- Use the Global Search, Advanced Filter and click-through filtering from the dashboard.
- Export filtered views.
- View SIM Details.
- View SIM data allowance and usage.
- View the Daily Usage Report and Sessions Report.
- View the Estate History Report.
- Perform SIM searches.
- Change their own email address, full name and password.
- Opt-in to receive notification emails and portal notifications from all SIMs.
- View SIM location.
- Manage portal notifications.
- Access Help and Support.
USER - What can a user of type User do?
Everything that a View Only user can do, in addition to:
- Edit the Notes associated with a SIM
- Edit and bulk load Custom Fields
- Run SIM Diagnostics, including ping
- Enable and Disable SIM authentication
ADMIN - What can a user of type Admin do?
Everything that a User can do, in addition to:
- Manage sub-Accounts and their associated users
- Move SIMs to and from sub-Accounts, and between sub-Accounts
- Activate SIMs
- Manage Tags
- Set Alert and Cap levels
- Add and remove notification email addresses
- Add and delete Custom Fields
- Terminate the current data session for a SIM
Once created, the new user will have their Zest4 Connect credentials automatically emailed to them.
This Password creation email will come from the email address: noreply@connectivity.management – It may wind up in your Junk folder. Please mark this email address as a Safe Sender, as this same email address is also used to send Alert/Cap notifications through the portal.
You can also enable Two-Factor Authentication for users if required.
If you are struggling to create portal logins then please contact the M2M Support team via Support Ticket on the Zest4 Customer Portal or email service@zest4.com who will be happy to assist you further.
2.0 Managed Accounts
You can create new sub accounts on the Zest4 Connect portal, which you can then allocate sims on your estate to these sub accounts easily enough. This is great if you have sims at different sites throughout your business, as you can then create an account for each site.
A Managed Account provides the customer with access to their SIM estate. This access allows customers to monitor, manage and report on their SIM estate. Associated with each Managed Account is at least one user of type Admin, and zero or more users of type User and View Only.
If a customer re-sells SIMs to a sub-customer, an Admin user can create a sub-account for that sub-customer which will allow that sub-customer to manage their own SIM estates. Sub-customers can also sell SIMs to their sub-customers, and so on.
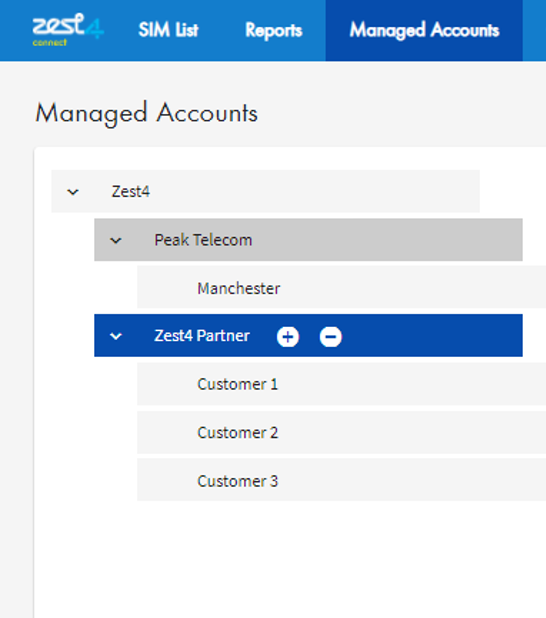
Example:
Zest4 is the main account. Then you can create sub accounts that sit underneath:
- Birmingham
- London
- Wilmslow
To do this you will need to go on the “Managed Accounts” tab at the top of the Zest4 Connect portal. You then click on the “+” sign next to the main account. Once clicked, this creates the new sub account and allows you to name it.
As an admin user, you can now allocate sims from the main account, to the new sub accounts. To do this you must go back to the dashboard and select the sims you desire to move to the new sub account. We will explain in more detail how to move SIMs between accounts, later in this guide.
See section: 13.0 Bulk Actions
3.0 Dashboard Display
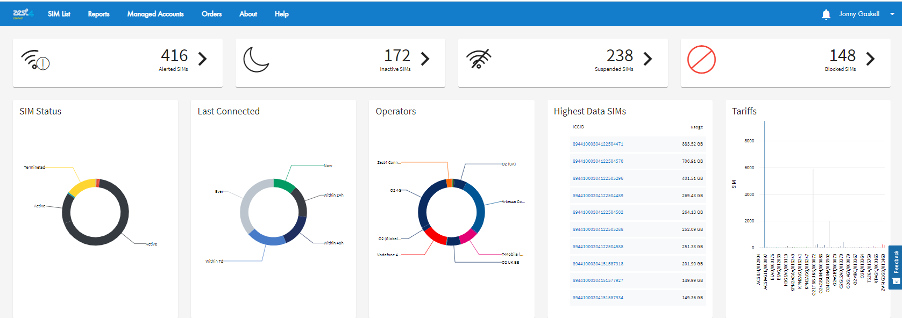
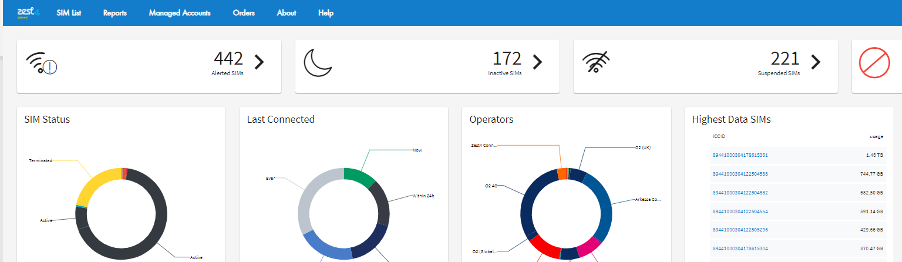
The Zest4 Connect Dashboard shows a summary of the current state of your SIM estate:

The following information is displayed:
Alerted SIMs – displays the number of SIMs which have currently exceeded their usage Alert threshold in the current calendar month.
Inactive SIMs – displays the number of Inactive SIMs.
Suspended SIMs – displays the number of Suspended SIMs.
Blocked SIMs – displays the number of SIMs which have currently exceeded their Cap threshold in the current calendar month.
SIM Status – displays a pie graph showing the number of SIMs in each state.
Last Connected – displays the number of SIMs that were last connected within the following periods:
- Now
- Within the last 24 hours
- Within the last 48 hours
- Within the last 7 days
- Ever
Operators – displays the number of SIMs of each Mobile Network Operator (MNO).
Highest Data SIMs – displays the ICCIDs (SIM numbers) of the top 10 SIMs in terms of data usage used in the current calendar month.
Tariffs – displays the number of SIMs on each tariff.
Clicking on any of the graphs displays a filtered view of the SIM List. E.g. clicking on the Active segment of the SIM Status pie chart will cause the SIM list to be displayed showing the Active SIMs. Also, if clicking on one of the top ten SIMs, this then causes SIM Details to be displayed for that particular SIM that you have clicked.
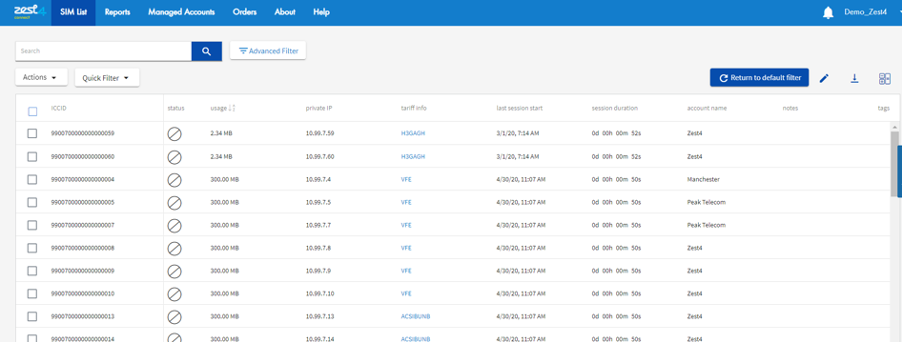
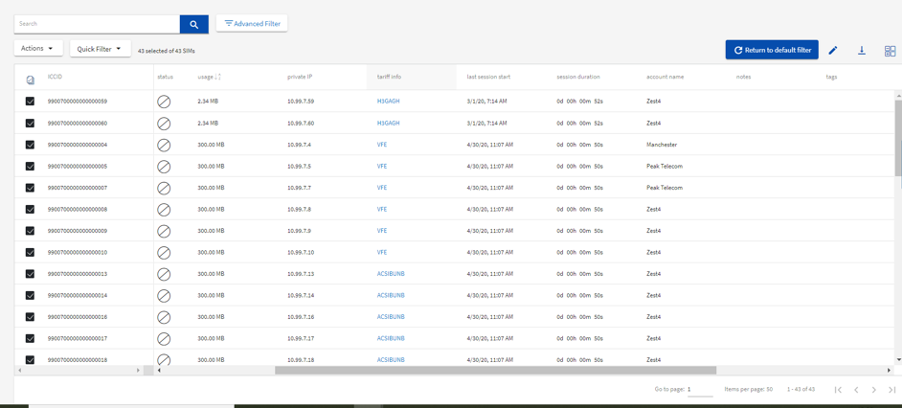
4.0 SIM List Screen
The SIM list screen is where you can view specific information about a SIM that you have searched for, or view a filtered group of SIMs including details such as MSISDN, ICCID, MNO, Account Name, IP Details etc.
Please Note – the usage visible on this screen is the usage incurred by the SIM(s) in the current calendar month only. You can view SIMs in a filter, based on any number of different attributes. As examples, you could bring back usage based on a filter of Blocked SIMs that you can see on the landing Dashboard screen to the SIM List screen; or you could use a filter and view the particular SIMs of a specific sub account too. You can also save your most commonly used filters as well.
See section: 8.0 Advanced Filters for more information.
There are a few useful things you can do with the information displayed on this SIM List screen:

Edit Columns
You can edit the visible columns and change the order they appear on screen.

Export
You can download all of the information that is displayed on this screen into Excel using the Export button.

Calculate Total Usage
This will show you the total data usage of all the SIMs in the SIM List filter for the current month. This is useful if you have multiple SIMs utilising a shared or aggregated data tariff, and you need to see how much data these specific SIMs have used collectively so far in the current calendar month.
5.0 Search for a SIM / View Details
SIMs can be searched via any of the following:
- ICCID (SIM Number)
- MSISDN (Mobile Number)
- Info
- Notes
- Private IP
- Public IP
Example – How to search for SIM ICCID 9900700000000000006?
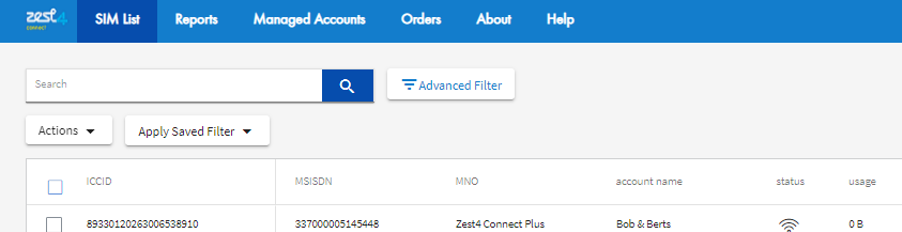
- Click into the SIM List option at the top left corner and enter the number into the search box at the top left of the screen.
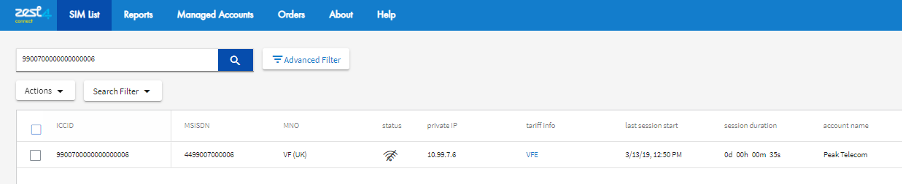
2. Type or paste the ICCID into the search box and hit the magnifying glass symbol, or press return.
The system will filter the result.
Did you know the filter must be reset before making a new search? This can be done by clicking the ‘Return to default filter’ button.
How do I view my data?
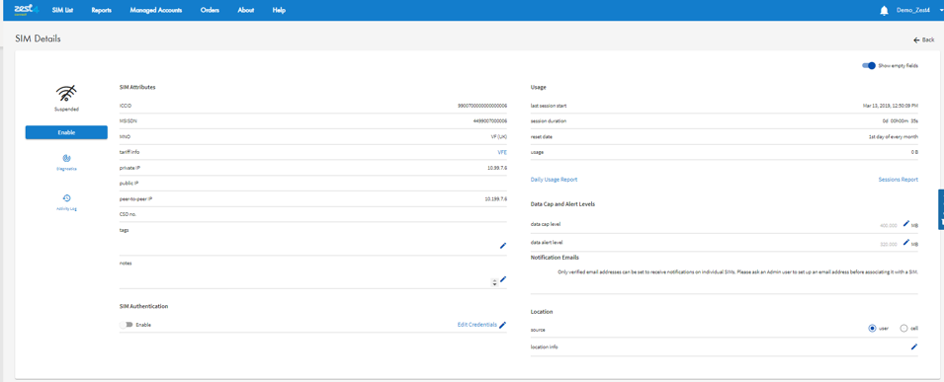
If you click on the SIM in the SIM Details screen, it will take you through to a new screen, providing further details for an individual SIM.
Example - How to view details of a SIM?
In the SIM List section, hover over a SIM until it highlights grey and then click the mouse.

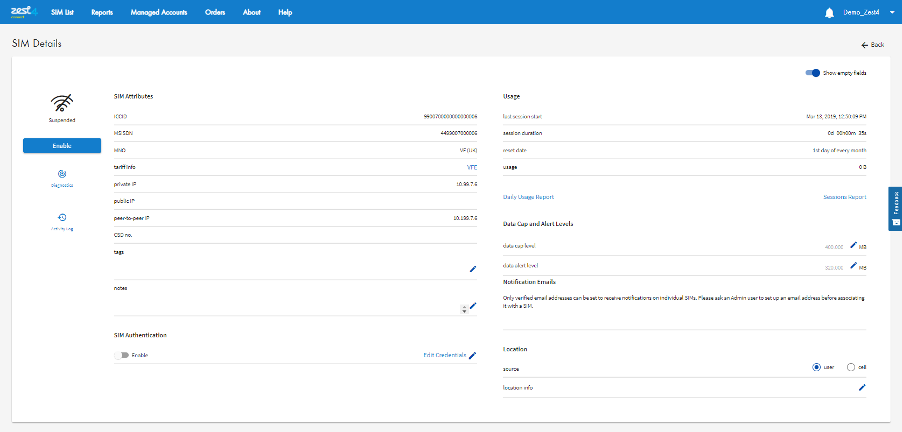
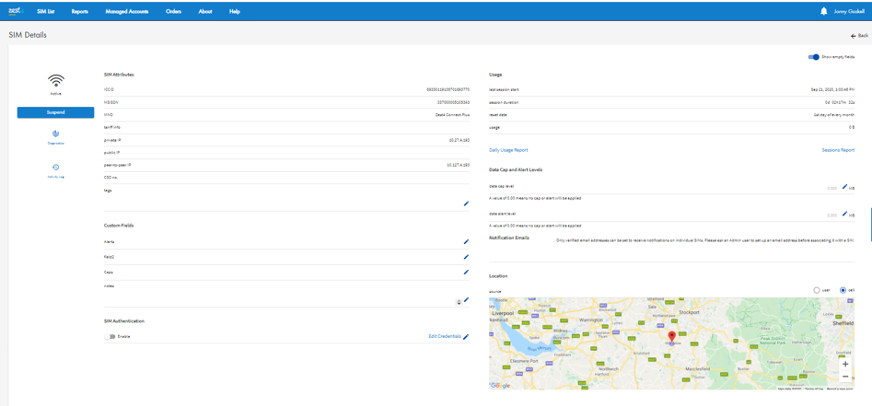
Here is a SIM summary screen, where a lot of useful information can be viewed, and a multitude of actions can be undertaken at SIM level including the following (subject to relevant user permissions):
- Usage for the current month can be viewed, and the date and time of the most recent data session visible.
- The Status of the SIM can be viewed.
- MNO and IP Address details can be viewed.
- View Map Location of most recently connected to cell site area.
- Notes can be added/amended.
- Amend Cap/Alert thresholds.
- Amend Email notifications.
- Run Data Usage / Session Reports on the SIM.
- Run SIM Diagnostics, including send device pings and perform SIM refreshes (specific networks only).
- Suspend/unsuspend the SIM.
- View SIM Activity Log to see what changes have been made, by whom, and on which date and time.
Notes & SIM Activity Log
For example, the Notes could be used for a device identification number, which then enables a record to be held of which SIM is in which device.
This screen also shows the SIM’s Activity Log, which records when any of the following occur:
- A SIM is added to Zest4 Connect.
- A SIM is activated.
- The SIM’s data Alert level is set.
- The SIM’s data Cap level is set.
- The SIM’s data has been Suspended.
- The SIM’s data has been Unsuspended.
These entries include the date, time and user who performed the activity.
6.0 Reporting Functions
Emport provides a variety of options to view and manage reporting either on a single SIM, or across an entire estate base.
The following reports can be produced. Each provide further levels of detail to help you understand your SIM or estate better.
Sessions Report – A Sessions Report can pinpoint session times of a SIM for example the start and stop session times. There is also the option to show session interim updates, for Mobile Operators that provide them. Session information is retained for 3 months.
Daily Usage Report – A SIM History Report can be carried out to view the data usage of a single SIM over a defined period of time. Daily usage history is available for 1 year.
Estate History Report – An Estate Report displays data usage across all SIMs which are under account/sub account management. Estate usage history is available for the past year, though usage can only be run in a maximum of 31-day periods at a time.
Note: Data usage shown in Zest4 Connect is indicative and may differ from that shown in your monthly invoice.
Sessions Report
A Sessions Report can pinpoint session times of a SIM for example the start and stop session times. There is also the option to show session interim updates, for Mobile Operators that provide them. Session information is retained for 3 months.
- On the SIM List select the SIM for which you would like to see the data sessions. This is done by ticking the box next to it.
- On the Actions menu, select ‘Sessions Report’.
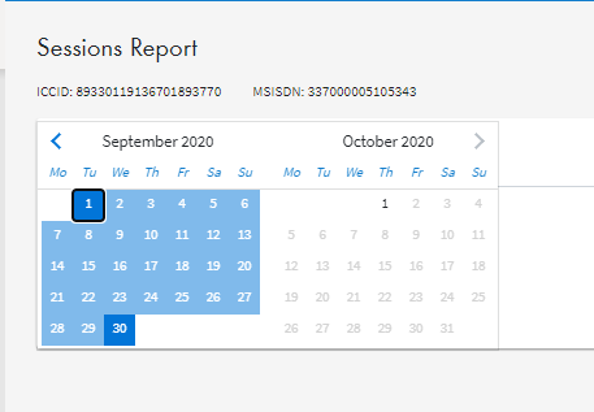
- Select the required date range. Note that the report will show sessions that start within this range.
- There is the option to include interim usage updates, if the Mobile Operator provides them.
- Click ‘Get Report’.
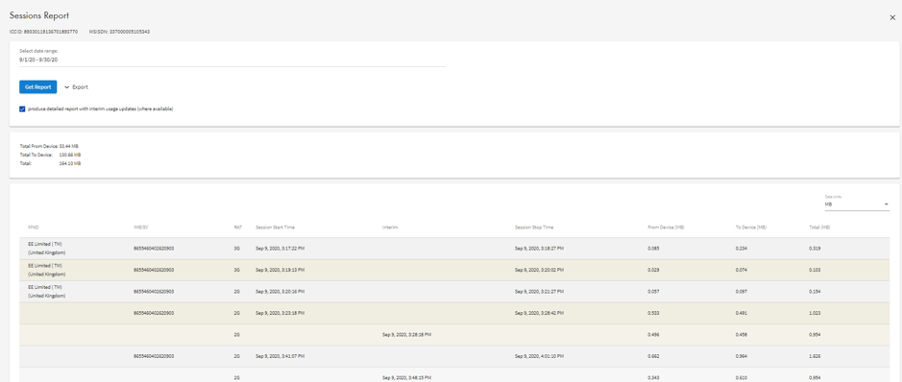
The following table is displayed:
- MSISDN
- ICCID
- MNO
- IMEISV
- RAT
- Session Start Time
- Session Stop Time
- From Device
- To Device
- Total
The data units can be switched between bytes, kilobytes, megabytes and gigabytes.
This table can then be exported to a file by clicking ‘Export as’ and selecting the required export format (CSV or XLSX). When the export is ready, a pop-up message is displayed. Click on this to download the export.
See section: 14.0 Advanced Filters for a description of some of the terms above see the Glossary of Terminology.
Note: Data usage shown in Zest4 Connect is indicative and may differ from that shown in your monthly bill.
Example - How to view a Sessions Report
- Locate the SIM in the SIM Details screen.
- Click on the Sessions Report option in the right of the screen.
- Select the desired date range (from the drop-down boxes)
- You can tick the box to get a more detailed report including interim usage updates (where available).
- Click Get Report. A table will appear listing the session stop/start times, total input/output from the device in MB and, and a combined total.
- There is also an option to export the information into Excel format.
Daily Usage Report
A Daily Usage Report can be carried out to view a single SIM data usage over a defined period of time. This can be particularly useful if you would like to understand how much data is being utilised on the SIM on a per-day basis.
- On the SIM List select the SIM for which you would like to see the daily usage. This is done by ticking the box next to it.
- On the Actions menu, select ‘Daily Usage Report’.
- Select the required date range.
- Click ‘Get Report’.
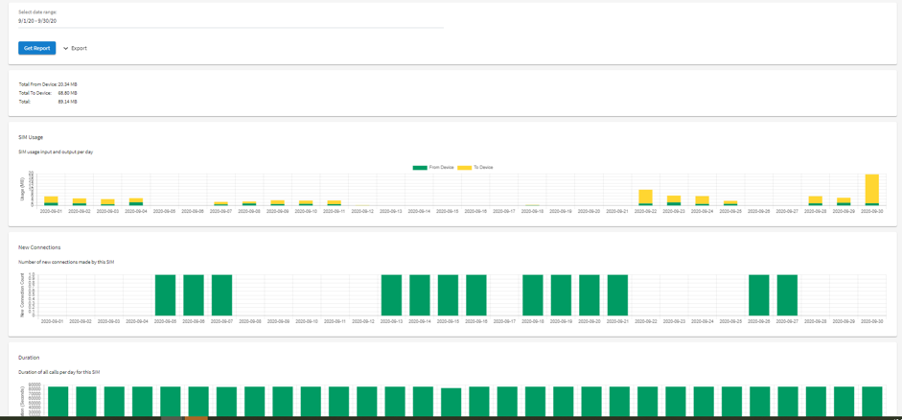
- The following graphs are displayed:
- SIM Usage. This shows the data usage to and from the device per day.
- New Connections. Shows the number of new connections made by this SIM each day.
- Duration. This shows the duration of all calls per day for the SIM.
- The report can be exported by clicking Export and selecting the required export format (CSV and XLSX). When the export is ready a pop-up message is displayed. Click on it to download the export.
Note: Data usage shown in Zest4 Connect is indicative and may differ from that shown in your monthly invoice.
Example - How to view a Daily Usage Report
- Locate the SIM in the SIM Details screen.
- Click on the Daily Usage Report option in the right centre of the screen.
- Select the desired date range (from the drop-down boxes)
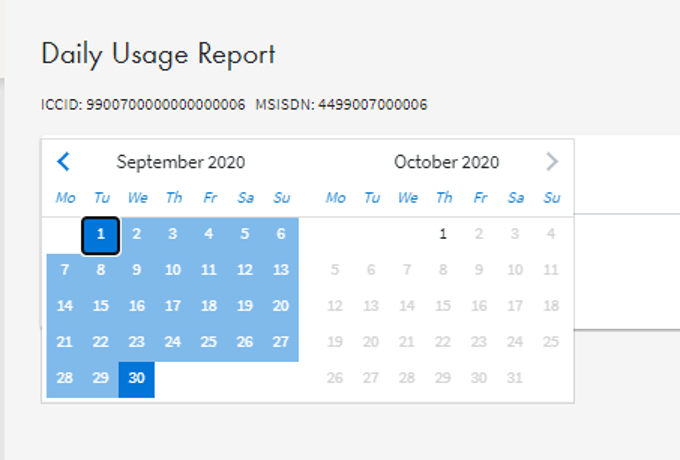
- Click ‘Get Report’. The requested data will be presented in both multiple graph/table formats.
- The report can be exported by clicking ‘Export’ and selecting the required export format.
Estate History Report
An Estate History Report displays data usage across all SIMs which are under management. This can be particularly useful if you would like to understand how much data is being utilised on a per-day basis.
- Click on Reports on the top left of the main navigation bar.
- Select the required date range. The range can cover up to one month.
- You can also filter the report by sub-account and Mobile Operator.
- Click ‘Get Report’
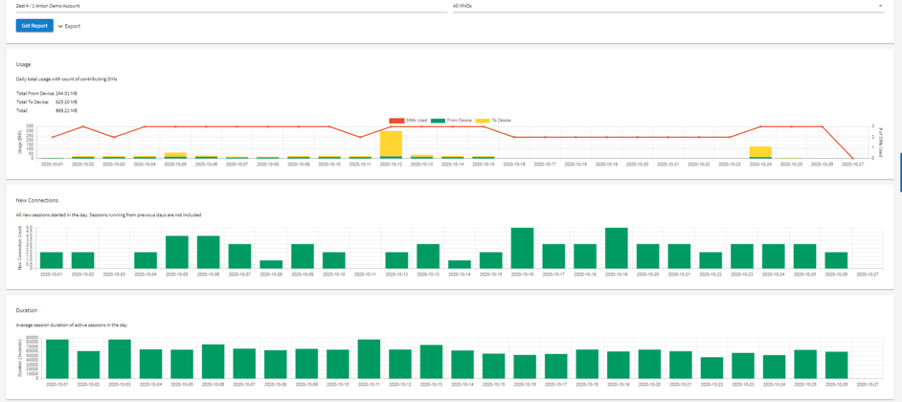
The data usage is presented the following graphs:
Usage – The daily total usage to and from the device. This includes a count of the number of SIMs contributing to the usage.
New Connections – Shows all new sessions started in each day. Sessions running from previous days are not included.
Duration – Average session duration of active sessions in each day.
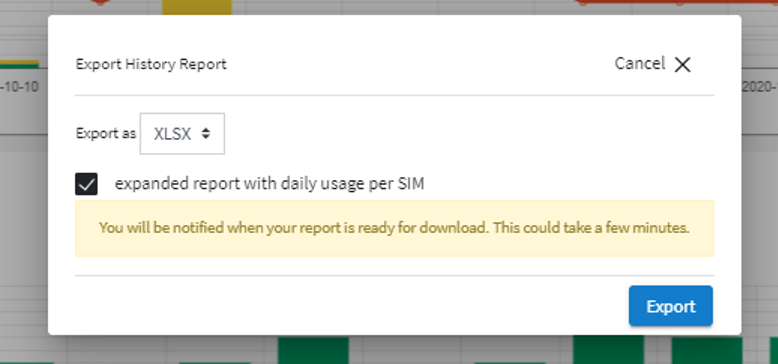
To save an export click Export and select the export format you require (CSV or XLSX). When the export is ready a pop-up message is displayed. Click on it to download the export. There is also the option to perform an expanded export with daily usage per SIM. The export shows usage in bytes.
Note: The data usage shown is indicative and may differ from that shown in your monthly bill.
Example - How to view an Estate History Report
When in any screen on the portal, go to the Reports option at the top left.
Then select the date range, MNOs and the account(s) you want to be included in the report. The report can return data for the previous 12 months but can only be run in up to a maximum of 31-day periods at a time. If you want the usage for multiple sub-accounts at once, then you need to run it at the higher account level to cover all the required sub accounts as well.

You will then be presented with some graphs for analysis and you will have the option to Export the report into Excel by clicking the button that says Get Report.
You then need to click Export.
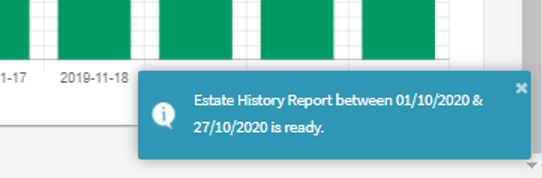
The report will run and you will be notified in the bottom righthand corner once the report is ready.
Please note the usage in the report will be in Bytes and will be broken down by MSISDN and by date in the month. The report will only return MSISDNs that have had some usage through the private APN, during the date range that you have selected. MSISDNs with zero usage for the desired date range will not be shown.
If you want the figures in KB then you should divide the figures in the report by 1024, and then that figure by 1024 to get MB, and so on to get GB, TB etc.
7.0 SIM Status
Status is displayed as a column in the SIM List and SIM Details screens and is used to identify the current operational status of a SIM.
Inactive
Pre-provisioned state, no service is available but ready to be activated via the portal. The SIM is not in a billable state.
Activation Pending
Awaiting activation by the Mobile Operator.
Active
The SIM is in an active state and is billable. The status icon is green and labelled as connected when the SIM is in session.
Alerted
The SIM has reached a data alert level (default 80%). The SIM is in an active state and is billable.
Suspended
Partial service and is billable. The SIM is prevented from starting a new data session via the private APN. To prevent the SIM from connecting via other methods, for example the Public APN or voice/SMS, a full suspension must be requested to Zest4.
Blocked
Partial service and is billable. The SIM data cap threshold has been reached. The SIM will be prevented from starting a new data session.
Terminated
SIM has been requested for SIM Disconnection. Service terminated with the mobile network operator and charges cease with 30 days’ notice period from date of request.
8.0 Advanced Filter
An Advanced Filter is a powerful way to group SIMs together based on a defined set of parameters. It allows users to create a filter based on the following data:
- A list of ICCIDs, MSISDNs, CSD numbers or private IP addresses. This list can be loaded either by uploading a CSV file or by pasting a list. The list can also be edited after it is uploaded or pasted.
- SIM Status – Multiple SIM Statuses can be selected.
- Operator – Multiple operators can be selected.
- Account – Multiple Accounts can be selected.
- Tags – Multiple Tags can be selected.
- Tariff Info – Multiple Tariffs can be selected.
- Usage – A range of usage can be applied by moving the sliders. Fine adjustment can be achieved by using the left and right arrows keys.
- Last Connected – This is filtering according to the last time the SIM was connected. The following options are available:
- Now
- Not now
- Within the last 24 hours
- Not within the last 24 hours
- Within the last 48 hours
- Not within the last 48 hours
- Within the last 7 days
- Not within the last 7 days
- Ever
- Not ever
You can access Advanced Filter on the SIM List screen.
Click the Advanced Filter button and it will present the different options that you can filter on.
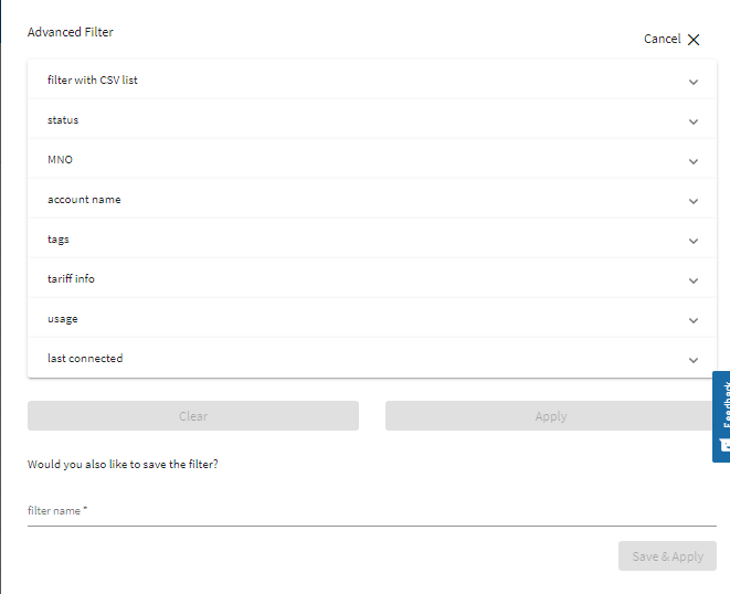
If you want to re-use a filter, you can save it and give it a name. Why not make a filter to save time and reduce the number of clicks? You can also make a filter the default, so that it is remembered when you log out and log in.
9.0 SIM Suspension
Suspend will prevent a SIM from starting a new data session via the private APN.
Please note a full mobile network suspension must be requested to prevent a SIM from using any communication service, for example via the Public APN, SMS or Voice.
If you would like to apply a full mobile network suspension, please submit a Support Ticket via the Zest4 Customer Portal or send an email request to Zest4 M2M Support team at: service@zest4.com.
If the request is urgent, please call the M2M Support team on 0161 956 3300 Opt 1 Opt 1.
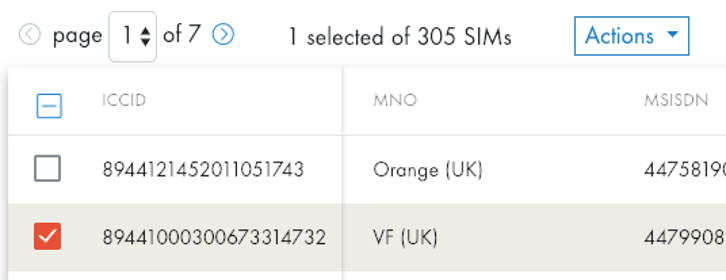
Suspend through Zest4 Connect will prevent a SIM from starting a new data session via the private APN.
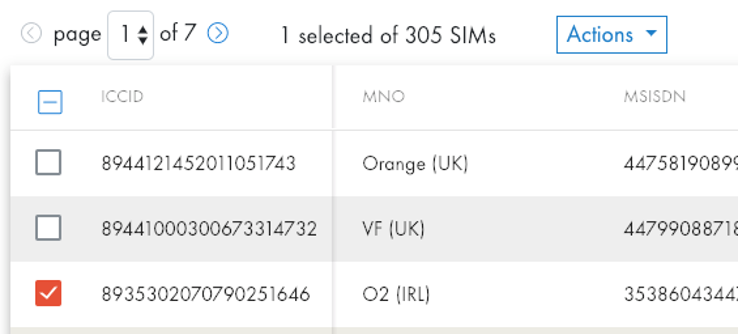
- In the SIM List, tick the SIM you wish to suspend.
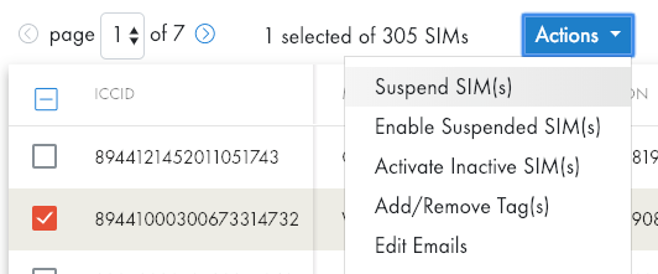
On the Actions menu, select Suspend SIM(s):
The result of the Suspend is displayed:
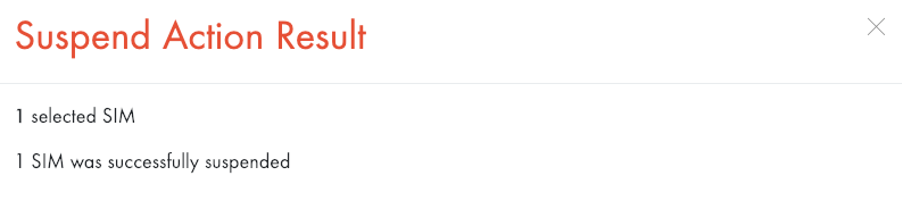
This will change the status of the SIM from ‘Active’ to ‘Suspended’.
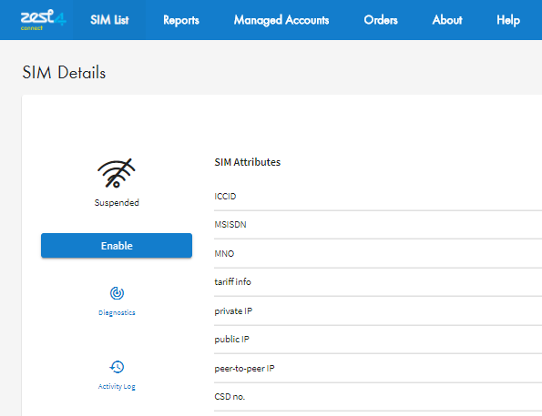
You can also Suspend a SIM from the SIM Details screen by clicking on the blue button titled Suspend on the left side of the screen:
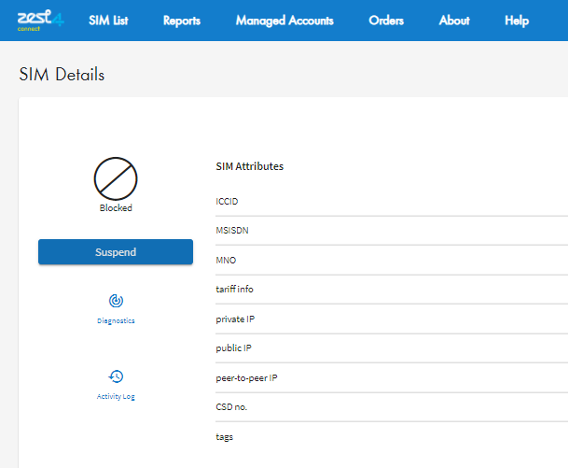
To unsuspend a SIM then you just need to follow the same two processes above and instead select Enable Suspended SIM(s) from the SIM List filter.

Or click the blue button Enable on the SIM Details screen on a suspended SIM.
10.0 Support - SIM is not working
If you find your device does not have a data connection, there are several investigative steps you can take that can lead to a speedy resolution.
1. Run the Zest4 Connect Diagnostics tool. This will: check the SIM status allows for data connectivity, try to ping the device, allow you to refresh the SIM (if allowed by the network).
Some SIM statuses are designed to block data connection attempts, these are: Suspended, Blocked, Inactive and Terminated. A data connection via the Private APN will only be accepted if the SIM status is: Active or Alerted.
- Blocked – This means the SIM’s data usage (see ‘Usage’ column on dashboard or SIM details page) for this calendar month has exceeded its Data Cap level. To resolve this, you can wait for the usage to automatically reset at the end of the calendar month, or you can increase the data cap level above the SIM’s data usage level. Both will result in the SIM moving to a Live state and new authentication attempts being accepted.
- Suspended – The SIM is in a Suspended state due to user action or request. You can un-suspend the SIM in Zest4 Connect.
See section: 9.0 SIM Suspension
- Inactive – The SIM is currently not activated. Activate the SIM and it will start working.
- Terminated – The SIM was previously requested for disconnection and the 30 days’ notice has been served. The SIM is now terminated and cannot be used.
2. Check the APN settings on the device are correct – If you are unsure what the correct APN settings are for a SIM you can find it: on the Order Form we provided when the SIMs were activated, in the closing email of the ticket in which the SIMs were activated, or it can be figured out based on the IP address of the SIM.
TIP: If you regularly find yourself asking what the APN details of a SIM is, consider adding an “APN” custom field in Zest4 Connect and recording it there. You and other Zest4 Connect users will be able to access this information easily. For help on doing this please contact Zest4 M2M Support on 0161 956 3300 Opt 1 Opt 1.
3. Reboot or power cycle the device.
4. Check the local network coverage and mast status. Many networks provide an online coverage checker. They can be found by Googling “XXXXX network coverage checker”.
5. If using the SIM internationally, ensure data roaming is enabled on the device. Please see your device manual or consult your device manufacturer on how to do this.
6. Other useful things to do are: try the affected SIM in an alternative device, try an alternative working SIM in the same device, try the device in a different location, manually roam the device on to the authorised network, manually roam the device onto a different network (if possible), attach an antenna to the device.
If you are still experiencing data connectivity issues after completing some or all steps above, please raise a Support Ticket on the Zest4 Customer Portal – https://zest4customers.com or email the M2M Support team at: service@zest4.com.
Please note: We understand that due to the nature of how some devices are set up and where they are located, that a device reboot may not be possible.
11.0 Performing a Device Ping
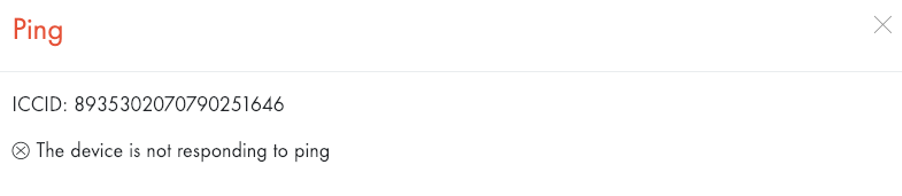
A ping can be described as a ‘virtual handshake’ which sends a very small amount of data to the device.
If the SIM is contactable, it will send a small message back showing it is online.
Did you know that not all devices are configured to send a response to a ping? Please check your device settings or consult your device manufacturer if unsure.
How to Ping a SIM?
To help identify if a SIM is contactable a ping request can be initiated.
Tick the box next to the SIM you wish to ping:
On the Actions menu, select Ping.
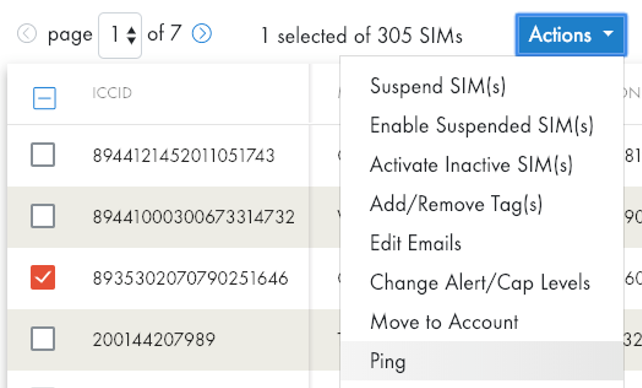
Click Ping and the result will display.
A ping along with basic diagnostic checks, can also be carried out when in the SIM Details screen on a specific SIM. Press the button that says Diagnostics.
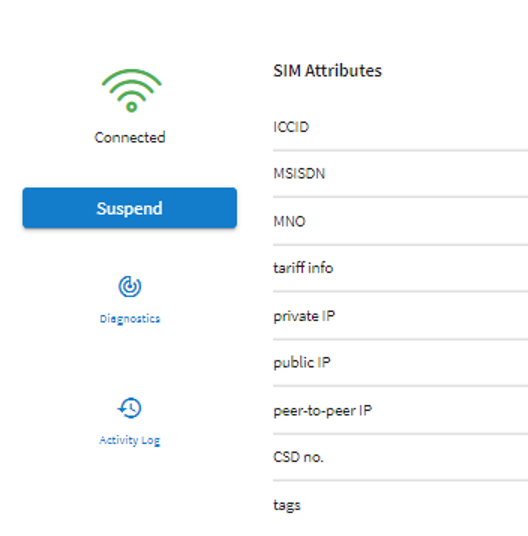
This will then run a quick check on the SIM and try to ping the device. It will inform you if the device is not reachable. SIMs on certain networks will also give the option to Refresh the SIM. If the option is not here, then a SIM Refresh is not possible through the portal. However, Zest4 can still get the network to perform a SIM Refresh. Please contact the Zest4 M2M Support team to request this via Support Ticket type: SIM Refresh.

For further help and assistance in diagnosing an issue, please contact the Zest4 IoT/M2M Support Team on 0161 956 3300 Opt 1 Opt 1.
To help us resolve your incident as quickly as possible, it is helpful to provide as much information to Zest4 as possible regarding the issue and impact. We will generate further investigation into the problem with the network, and work with you to a resolution.
12.0 Setting Data Caps & Alerts
Data Alerting and Data Capping are services to help you monitor and control your data usage. They are commonly used to limit the amount of data that is used beyond the SIM’s allowance. This is done by setting a Data Cap threshold at the same level as the SIM’s agreed tariff allowance.
Data Capping
When a SIM reaches its cap threshold, an email is sent to the customer stating that the SIM has reached its Data Cap threshold and no further data sessions will be allowed.
The Data Cap threshold, and the list of email addresses to which the notification is sent, are configured in the SIM Details screen.
In addition, for operators that support it, the customer can request that the data session is terminated when the Data Cap threshold is exceeded. This is configurable in the SIM Details screen. Please contact Zest4 to obtain a list of operators that support these “hard caps”.
If you would like to break an existing data session, you can either complete a remote reboot on the device or request Zest4 to process a mobile network refresh by sending a request through to Zest4 by raising a Support Ticket through the Zest4 Customer Portal, during Zest4 business hours (9am – 5.30pm). Urgent requests can also be called through during business hours to IoT/M2M Support on 0161 956 3300 Opt 1 Opt 1.
Important note: For SIMs where the operator doesn’t support hard caps, if the SIM is in an existing data session and exceeds its Data Cap threshold, data usage will continue until the current data session comes to an end.
Data Alerting
Zest4 also provides the ability to send a warning notification email (an alert) when the SIM’s data usage is approaching the cap threshold. Typically, customers set the alert threshold to 80% of the cap threshold.
The data cap and alert thresholds, and the list of email addresses to which the notification emails are sent, are configured in the SIM Details screen.
Important note: Notifications are only generated once when the SIM’s usage exceeds a threshold. Reminder notifications are not sent.
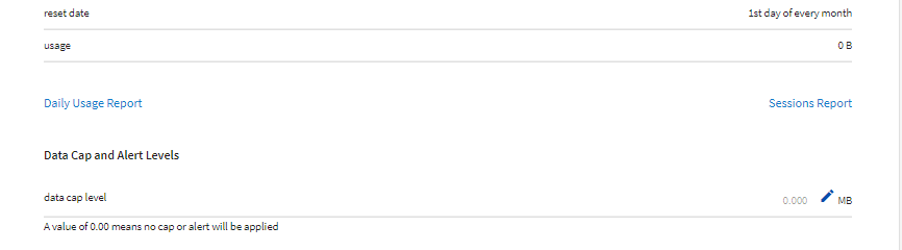
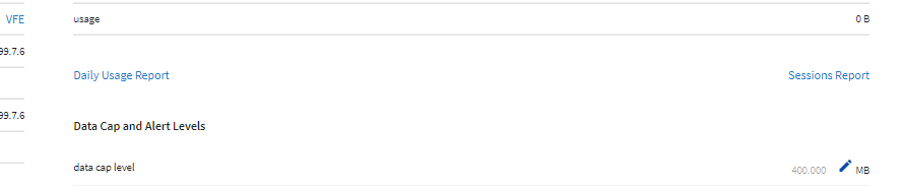
If you have the requisite Admin permissions, then you can change the level of Alerts and Caps on numbers either individually or in bulk. Note that only users of type Admin can set SIM Data Caps and Alerts.
- In the SIM List page, click on any SIM for which you wish to set a data Cap or Alert.
- Then on the SIM Details page, Click the pencil icon next to the cap or alert that you wish to change. Make the change and click/tab away.
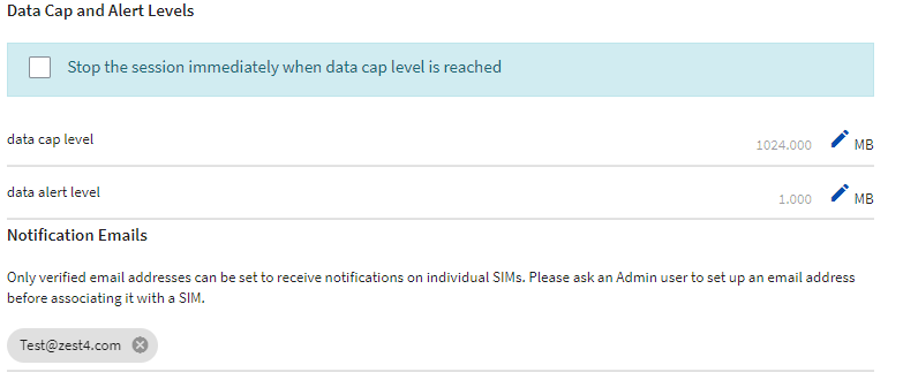
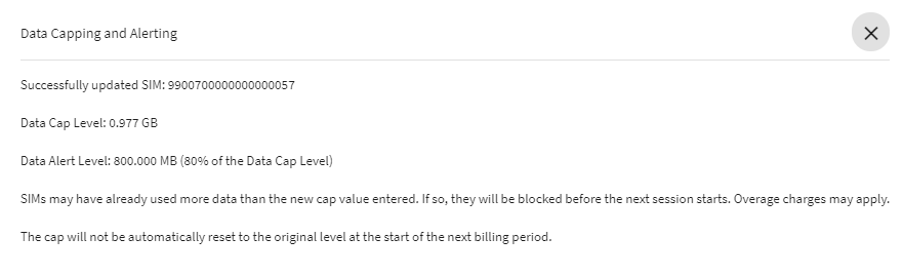
- A confirmation message is displayed.
- Here you can also add/amend the email addresses that will receive the notifications. Please note email addresses that are not active portal logins, will need to be verified first in the Managed Accounts section.
PLEASE NOTE:
- When changing the cap level, the cap will not be automatically reset to the original level at the start of the next billing period.
- Setting the cap level to zero, removes any Cap. Setting the Alert level to zero, removes any Alert.
- MNOs report usage periodically, and a SIM alert or cap will not be triggered until the data usage has exceeded the threshold. Hence the usage for a SIM may show more than the configured alert or cap level. However, when a cap threshold has been exceeded, the SIM will be blocked, and no more sessions will be allowed.
- Some MNOs do not report usage during data sessions. Consequently, for those MNOs, SIM alerts and caps will only be triggered at the end of the data session.
- If the SIM has exceeded its contracted inclusive allowance, overage charges will apply.
- Changing the Cap level will always change the alert level to a default of 80% of the Cap level. However, the alert level can be amended to any bespoke level lower than the Cap level.
- The Alert /Cap values are always in MB. Spend Alerts are not supported in this portal.
- Group Bundle alerts are not currently supported through this portal, however the current data usage of a filtered group of SIMs can be checked in the SIM List screen at any time using the Calculate Total Usage button.
- Data usage shown in Zest4 Connect is indicative and may differ from that shown in your monthly bill.
- For certain networks, you will also have the option to Stop the session immediately when the data cap is reached. This means as soon as a SIM hits a Cap level, the number will be forced out of data session and Blocked. If this option is not available, then this functionality is not supported, and the SIM will need to finish its current data session, before the SIM is Blocked.
Hard Caps
Some SIMs support the ability to request the MNO to terminate a data session when the cap level is reached (in addition to preventing further data sessions). Those SIMs have the following tick box available when setting the cap level:

13.0 Tags
What is a Tag?
A Tag is a method of individually identifying SIMs.
As an example, you may want to assign a Tag to a SIM that belongs to a specific customer or is located in a particular area.
Note that only Admin users can create and amend Tags.
How to create and assign a Tag
Tags can be used to quickly organise and locate SIMs from your estate. Note that only Admin users can create Tags.
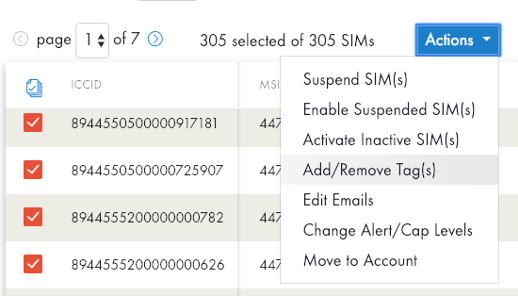
- On the SIM List, tick the SIMs for which you want to assign a Tag.

On the Actions menu, select ‘Add/Remove Tag(s)‘.
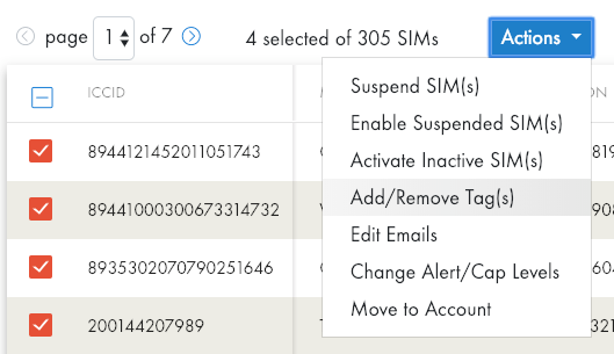
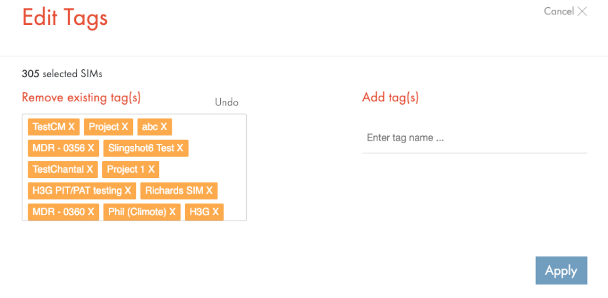
The Edit Tags screen is displayed.
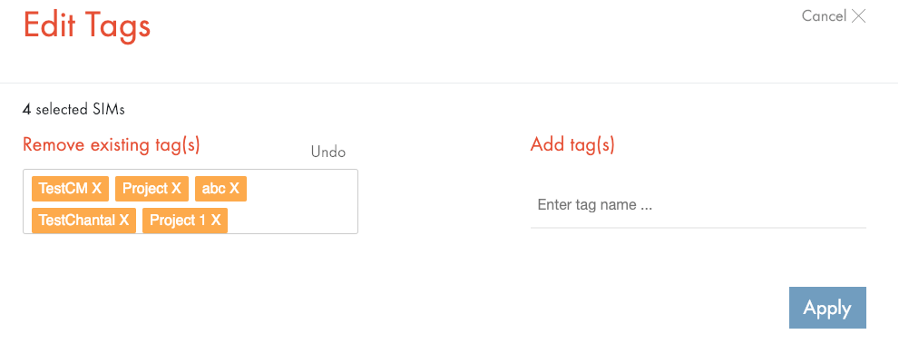
In the ‘Add tags‘ area type the name of the new Tag and click away.
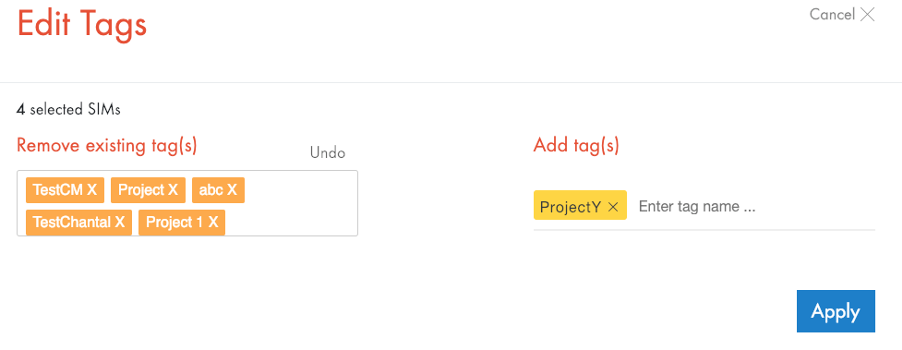
- Click Apply to save the change or Cancel to discard the change.
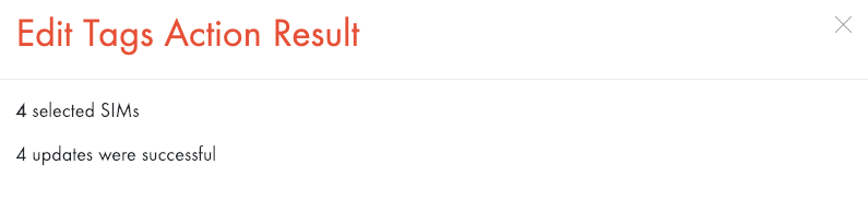
- A progress bar is displayed followed by a display of the result.
How to Delete or Rename a Tag
To delete a Tag:
In the SIM List, select all SIMs (the header icon should show).
- On the Actions menu, select ‘Add/Remove Tag(s)‘.
- To remove a Tag, click the ‘X’ next to it.
- Click Apply.
To rename a Tag, delete it and enter a Tag with the new name.
14.0 Bulk SIM Actions
How to make Bulk Changes
It is possible to make multiple changes such as moving numbers between accounts, change alert/cap levels, upload tags etc in bulk.
Firstly, upload the appropriate filter of SIMs into the SIM List and tick the numbers accordingly. If there’s more numbers that can fit on this page, be sure to click the Select button twice so that it selects all the SIMs on all pages.
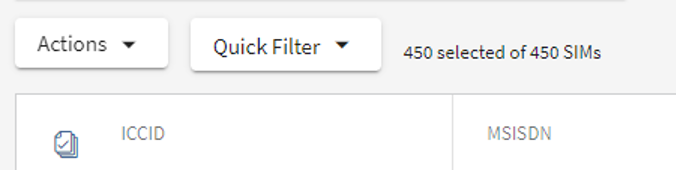
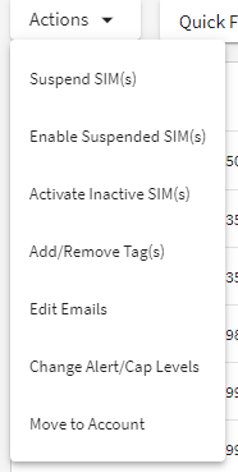
- Click the Actions dropdown option.
- Then Select from the available bulk change options below as applicable.
Please Note – If amending the Alert/Cap email addresses in bulk, it will return any email addresses in the Remove Existing email(s) field that are present against at least 1 of the SIMs that you have selected in your filter. It does not necessarily mean that the email addresses listed here are currently against all of the SIMs. It could be an email address is currently against 1 SIM out of the 450, 200 SIMs out of the 450, or 450 SIMs out of the 450 for example. So please consider this carefully when bulk amending emails.
15.0 Glossary of Terms
APN (Access Point Name) – An APN is the name given to a gateway between a GPRS, 3G, 4G or 5G mobile network. When establishing an internet connection, an APN name and sometimes a username and password are required to connect.
GSM (Global System for Mobile Communications Service) – GSM utilises the division of time and frequency techniques to increase the call capacity of a wireless network. Other services such as SMS, CSD and GPRS are also enabled through GSM. In Europe, Asia and Australia the 900MHz and 1800MHz frequencies are used, whereas America uses a frequency of 1900MHz.
GPRS (Global Packet Radio Service) – GPRS utilises GSM networks to provide wireless internet connectivity for phones, computers and other devices. Data rates vary between 56 and 114 Kbps. GPRS provides the basic level of internet connectivity before 2G, 3G, 4G and 5G.
HLR (Home Location Register) – A HLR is the main database within a cellular network that holds subscriber details including SIM profile, device, current location, identification encryption code and the users ‘home’ cell.
ICCID (Integrated Circuit Card ID) – Each SIM card is internationally identified by a unique serial number that is imbedded within the SIM profile, and is engraved or printed on the SIM card.
IMSI (International Mobile Subscriber Identity) – An IMSI is a unique 15 digit number used to globally identify a subscriber. The IMSI is stored within the SIM profile and provided to the network when connected. The IMSI can also be used to acquire details of the mobile number in the HLR.
IMEI – (International Mobile Equipment Identity) is a 15- or 17-digit code that uniquely identifies mobile phone sets. The IMEI code can enable a GSM (Global System for Mobile communication) or UMTS (Universal Mobile Telecommunications Service) network to prevent a misplaced or stolen phone from initiating calls.
IMEISV (International Mobile Equipment Identity Software Version) – An IMEISV number is a unique identifier that is associated with a given device and its software version. The identifier often called a serial number is assigned to the device by the manufacturer and can be used to track individual devices and what software version they are using.
IP Addresses – An Internet Protocol (IP) address that is designated for use in a public domain, such as the Internet. A public IP address is in contrast to a private IP address, which is in an address range designated for use only in a private domain, such as a local area network (LAN).
M2M – machine-to-machine or machine-to-mobile communications, via wireless technologies such as cell phone network technologies, WLAN, Bluetooth, and RFID (radio frequency identification). Applications include automatic meter reading, fleet management, vending, monitoring and control, security and alarms, and telemedicine.
MNO – Mobile Network Operator e.g. Vodafone UK, O2 Global, KPMG etc.
MSISDN (Mobile Station International Subscriber Directory Number) – The MSISDN is most commonly referred to as the mobile number. The number includes a country code and the remaining structure is defined by the mobile network. The MSISDN is used to track subscriber calls.
RAT (Radio Access Technology) – The underlying physical connection method for a mobile network.